Thursday, September 22, 2016

US Paras land

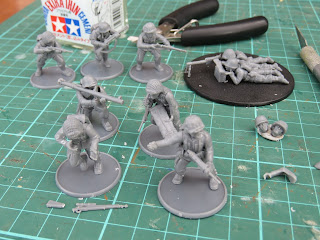
I was recently very generously given some 28mm Warlord Miniatures WWII figures by Swampy. The US Paras from the new "Band of Brothers" Starter Set along with an assembled set of the regular US infantry.

I've been beavering away getting them together. First impressions are they are beautifully made, great expressions on the faces, go together well but lack the extra bits of kit that would really give those extra options for kit bashing. There are a lot of Thompson SMG's in the kit.


I quite like firing figures and the kit is a bit short on Garands in that position so i cut out the carbine and added the M1 from the shouldered pose.

There is a base sprue in the kit but no larger bases so i've used an older flat GW 60mm base for the MG and crew and i'll probably build a second rather than trying to do more prone figures.
I've added a bazooka, bazooka rocket bag, grease gun, grenade hand and a Springfield scoped rifle from the remainders of the US kit (I'm not sure about the rifles issue but it will just count as a Garand if it's not needed).
The set of Warlord WWII American Infantry with lots of Springfield rifles. 


Saturday, September 3, 2016

Folding archery target butt

I do a bit of target archery and i've been fooling around with different low cost alternatives for targets. Cardboard is cheap but gets chewed up really quickly especially with high accuracy resulting in pass throughs. I had bought a target with two foam rubber faces and internal foam but it failed on the first arrow basically.

Then i came across this on Ebay from a Queeensland archer. Big enough to fit a three face target on. With freight it worked out similar price wise to a commercial foam target but hopefully will be more durable.


It's a bit irregular though so it needed a stand. I'd had a look on Google and Pinterest for stand plans and came across this on the Calcresult site.


Along with this pin on Pinterest which gives some angles and ratios for a competition stand.


Then it was a matter of heading out to the lab with some scrap from a deck we pulled up and voila. I managed to use what supplies i had in the shed without having to buy any more screws or bolts. I may run a piece of rope between front and back to stop in unfolding if the target falls off somehow.


Thursday, August 4, 2016

Some airbrush painting technology...

Vallejo paints and mig's "Painting Wargame Tanks"
I've ended up with a bit of late war British Armour here at Catweasel headquarters mostly 15mm but at least a couple of 20mm vehicles. Getting the colour right has kept me looking past my usual paints towards Vallejo especially when the Vallejo Russian Uniform colour keeps getting recommended. Then i realised Vallejo do coloured Primers. I'd also seen Heresy Brushs excellent book and example using a British Sherman which is here although he uses the Mig Jiminez paints.

Having farted around looking at different places to buy (as i don't have a hobby shop within a days drive) Vallejo and then stumbling across Wargame Miniatures which are at least in my home state I had a place to buy what i wanted. They had the Primer Vallejo's 73.607 U.K. Bronze Green which is a 60ml, Painting Wargame Tanks by Ruben Torregrosa and the Vallejo UK Bronze Green Painting System 78.407 which has 6 8ml pots included. I added some Vallejo cleaner and thinner and hit go. I would likely have got some extra PSC 15mm M4A4's but he had none in stock. Two days later it was on my doorstep. 

Monday, August 1, 2016

15mm Microtactix Normandy building project


These buildings are the continuing construction for some WWII 15mm war game props. None have their awnings or chimneys added yet. The two front right are the free tester model both printed in black and white. One has been coloured in with pencils. The barn building at back left is another freebie which you can find hidden in the Microtactix site. I've been printing these on plain paper then gluing them to cereal cardboard but it seems to be just that bit too stiff so I'll try printing onto cardboard when I remember to pick some up from the paper shop. 

Here you can see the underside. It's not possible to glue a base into them so I'm testing folding the bottom flaps inside as you can see on the right. I'll then make a base with a male plug to fit in the socket of the house.


I found a piece of buff? cardboard which I had in the hobby stash. It printed nicely and folds a lot easier so it looks like ill be switching to this method. I have noticed there are no bases in this set. 

Thursday, July 14, 2016

Pictures from Axol's build of a Bad Moon Gork

Local (to me) gamer Axol has been posting pictures of his Games Workshop Gorkanaut. He's trying to hit 30 minutes of painting a day which is a good discipline trick to keep moving on a project like this. He's using a Bad Moon paint scheme with yellow, yellow, yellow. It will be interesting to see it as he moves to the other colours and how this changes the "yellowness"

Have a look at his gallery over at Imgur

Microtactix Battlelands Set A progress

One of the smaller Normandy buildings showing how I get the join to set. I'm using an glue stick for adhesive but I do run tape over the inside of the joint. PVA glue may be an option that I'll explore where I need a stronger bond than the glue stick.

Wednesday, July 13, 2016

15mm Microtactix paper buildings

I've been working on these Normandy buildings in between World of Tanks battles. Bought the two sets of plans ages ago from RPGNow mostly for 20 mm but I've decided to give them a run in 15 mm which is what they were designed for. They are BattleLands 15mm Normandy: 1944 Set A-Buildings and  Set B-Ruins and Scenics.

Laser printed onto standard paper i'm reinforcing with cereal packet cardboard. the two ruins in the photo above are tests as i want to make them sturdy enough but still fine enough to look right to my eye.  

FOW 15 mm American paratroopers for scale. The building on the left is the trial downloadable here and the one on the right is from Set A-Buildings. Neither have chimneys yet and i will leave the awnings off the cafe? until i'm closer to completion. The structures are designed to go on a square street base but i'm thinking of sealing the bottom with some weight inside to make them more versatile.