Friday, June 5, 2020

The search - Vallejo equivalents for the Coat d'arms paints

I'm working on the Coat d'arms WWII German colours again and how they might translate to or from the excellent Vallejo colours which seem to be a standard for painting tutorials. Mostly because the Vallejo range are really nice paints.

I do have the Coat d'arms German paint set and they paint nicely so I wanted to work out the best uses for them. I've had a bit of a scour through Mick Farnworths book "Modelling and Painting World War II German Military Figures" and he has suggestions for what Vallejo paint to use where as well as a handy swatch chart. I've used this and a bit of eyeballing as well as the suggestions in the Coat d'arms download on the Black Hat website.


Here are my suggestions.

102 Black              - Black 70.950
227 Field Grey       - German Field Grey 70.830
503 Military Green - Luftwaffe Camo. Green 70.823
505 Green Grey     - German Dark Grey 70.995
515 Black Green    - German Extra Dark Green 70.896
516 Iron Grey        - German Dark Grey 70.995
518 Field Blue        - Luftwaffe Uniform 70.816
521 Army Green     - German Dark Green 70.979
525 Uniform Grey   - Light Grey 70.990
533 Slate Grey       - London Grey 70.836

I have another couple of posts further back in the blog with some suggestions for what they could be used for but i'd never got around to doing this bit till now.

Tuesday, June 2, 2020

Paint lids failing.

I have some elderly Coat d'arms paint pots which I've started using again. Unfortunately a combination of age and the crusty paint under the lid is causing the lids to split as I open them. Luckily I'd purchased some dropper bottles for mixing paints for the airbrush and I'm pressing them into service. I had been looking for a tiny funnel before I had a lightbulb moment. A sauce bottle lid works perfectly.


I’ve started transferring the paint and happily the old label peeled off and has been taped to the new bottle.

Saturday, May 30, 2020

20mm plastic figures and PVA.

One of the potential problems of using the really fine 1/72 polyethylene figures is that of paint flaking off in use because of their flexibility.  Historically probably more of a problem with enamel paints which aren't as flexible as the more modern acrylics. This may be a worse problem if they're based, or not, in a way that encourages touching the figures with your fingers.

I do prime any figures that I paint usually with black although I've experimented with other colours, brown and gray for example. I have read quite a few articles, there's one here on the Baueda site, where people swear by using watered down PVA as a base layer before painting. So I thought It would be an interesting experiment to give it a go on a unit of Revell Winter Germans I was painting up to be based for Crossfire.


I'm trying a couple of different things here. Holding the figures as you paint is a bit of an issue with figures this small and in the past i have used a small stick with 6 figures PVA'd to it. This is a problem if you're trying to get at the side of a figure so my solution stolen from the world of airbrushing is to use small nails with the figures glued to them. A bit of board with drill holes provides a place to dry.


My biggest concern was losing detail but the PVA seems to shrink a bit and was also watered down lightly. Simply applied with an old craft brush. An interesting side effect on the brush was it stripped any old paint sticking to the bristles.


I'll let them dry overnight and will see what they look like in the morning.


Monday, April 20, 2020

6mm viking settlement

WARGAME 1066 SAXONS VIKINGS NORMANS available from Helion

After a frustrating loss of article due to an incorrect button press, I'll have another crack. Luckily the images were stored in the cloud. I was painting some 6mm Dark Ages Heroics & Ros Vikings and Normans when I wondered if I could make a little settlement for them. Having the "1066" book on hand I scanned these pages as a pdf and printed them out. 


The book open to the building page and the test print. Dennis has mentioned somewhere that he under scales the buildings in the books slightly for 28mm. Some rough calculations and a bit of eyeball  comparison between the height of figure and doorways and I had what i was happy with.  


B & W print at 30% with a stand of 6mm archers for reference. There are three small buildings on the page, one with two separate doors.


The cutting begins, i did quickly colour the roofs with a pencil just to see what it looked like. 


Kitchen knife put into service to roll a roof.


I used super glue rather than paper glue or PVA as I wanted a quick bond. The only drawback is it leaves a stain as it draws up into the paper before it sets. A partial solution might be to use a toothpick or bent paperclip to apply the glue sparingly.  


The first building


Each tab and fold gets pre-bent as there's not much room to work once you start gluing. 


Building takes shape.


A bit of bin diving when i realised i'd "cleaned up" the doors for the barn.


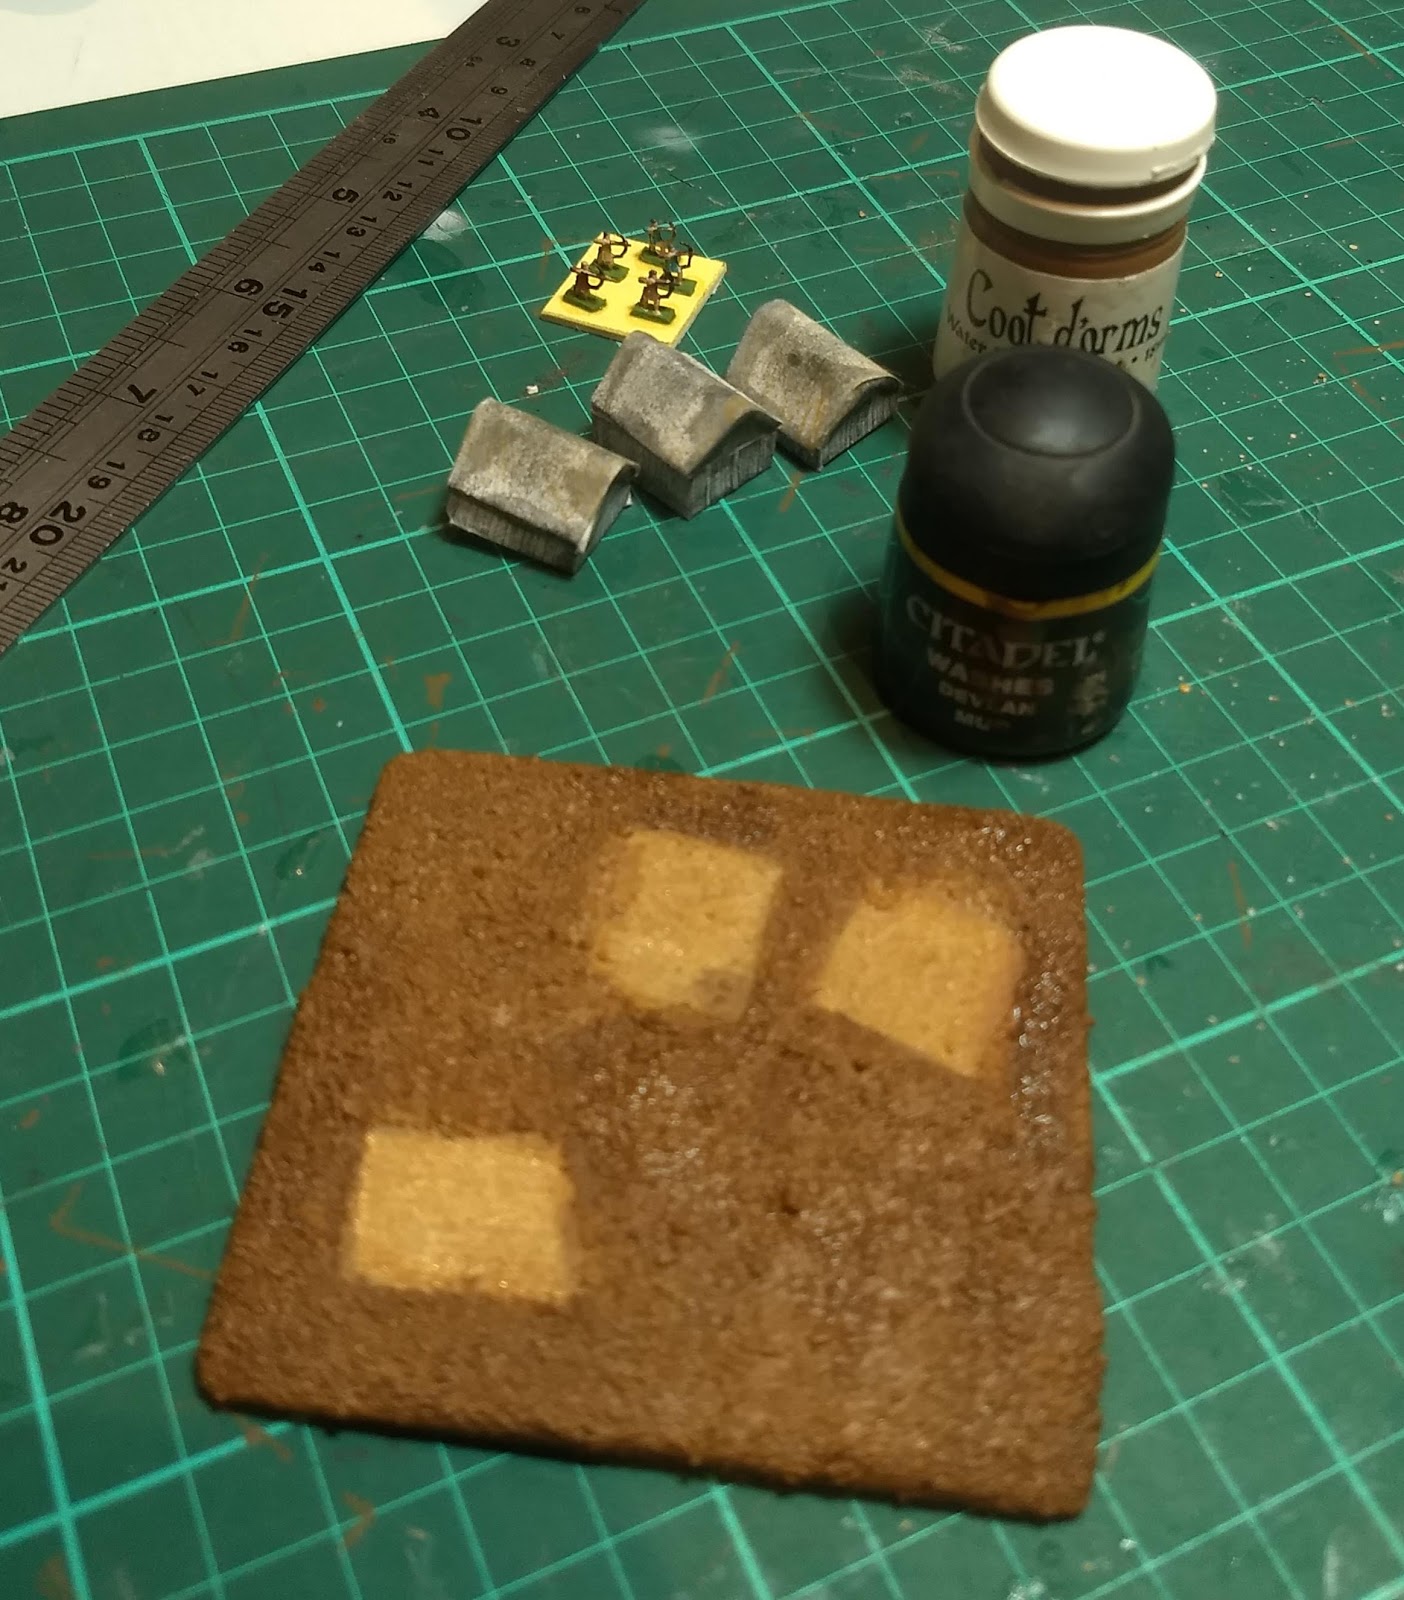
An MDF base from a piece of scrap with the building positions laid out. I'm just about to apply my basing mix, part beach sand, bits of plaster, rocks. It just gets added to as I find things to go in. Brush on PVA, sprinkle the topping over then just shake whatever hasn't stuck back into the tub.


Let dry then brush with PVA to seal.


First layer of paint, Coat d'Arms Barbarian Leather


Wash with GW Devlan Mud


Dab on grassy areas with Vallejo Violet Green?


Lighten up the grassed areas with an old GW LOTR pot, probably Goblin Green. 


I'm pretty happy with the result, it's simple and looks ok at this scale. I'll do it again at some stage when I get access to a colour laser printer. It could be used  as a little settlement on a table or an objective. I may add some trees /animals/ fencing/ troughs/ barrels if i ever get back to it as it looks a bit stark as it is.

Thursday, September 21, 2017

Games Workshop 40k Penitent Engine


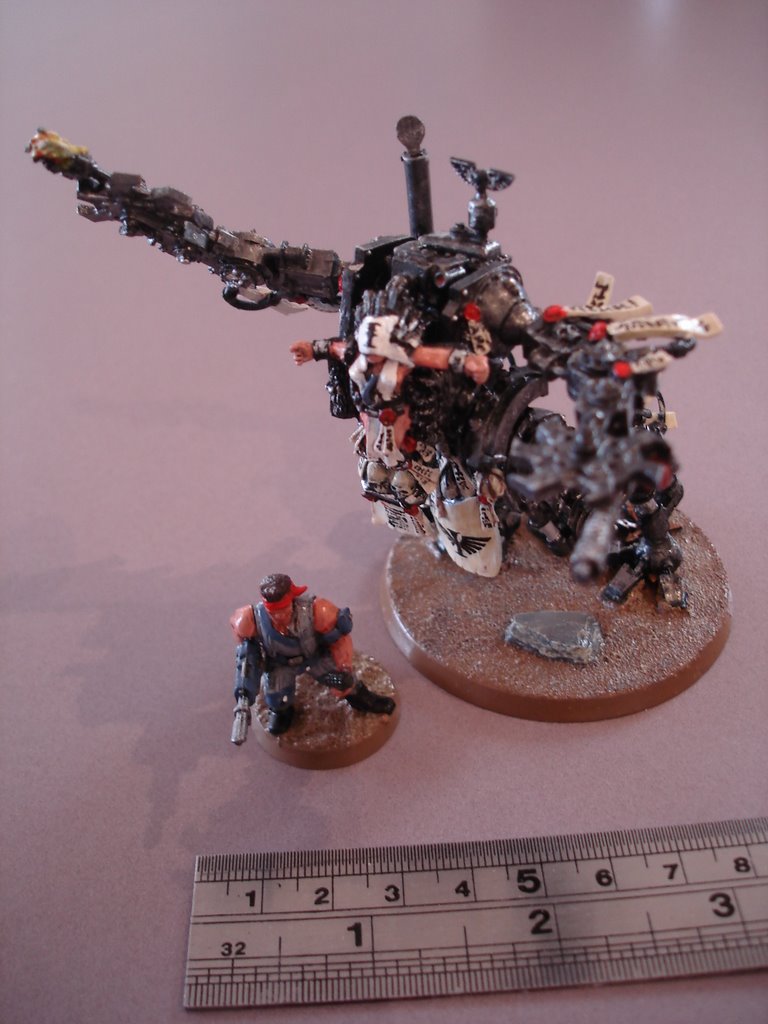
Inquisition icon ( the winged I) is a transfer, all the scrollwork is hand painted, from two feet away on a gaming looks very effective


The weak foot joint is pinned though base to leg, all the weight of the model goes onto these two points.

Deceptively large because of the outstretched arms, Catachan in urban camo for size. 


I tried to get some movement in the model as though it was swinging around towards something.
I painted this Games Workshop Penitent Engine for a friend and took these photos way back in 2008. It's a full metal model and a pain to get to sit together. The weight just dragged the glued joints apart and it required a fair bit of drilling and pinning to sit together.

Tuesday, June 6, 2017

Warmodelling 1/72 WW2 Late German Infantry

I picked these up from Wargame Miniatures in Melbourne (through the post). Delivery time was excellent and well packaged in a post box. The main idea was to get some more figures wearing the zeltbahn (a type of poncho made from a tent quarter) to match in with the AB Section in Zeltbahn figures I bought from Eureka Miniatures a few weeks ago. The soldier on the box front has one.


While i was getting them i spotted the Pak 40 kit which has four crew three of which are in the zeltbahn so that got added in to the parcel.


There are 20 figures in the box along with a tripod mounted MG42. Six figures in the poncho, an MG42 team firing over the shoulder of the loader and a crew walking with ammo cans and slung MG. A mix of smocks, Zelt's and normal tunic and short and long boots which is right for the time period.
 Warmodelling painted versions from Picssr album

It looks like there is some legal action pending with the original sculptor trying to stop a UK company reproducing the figures. The boxes i received are marked made in spain so im guessing they're older stock. Hopefully Xan will continue with his own sculpting and add some to this range when its resolved.

The animation is good on the figures but they seem a bit indistinct in their casting compared to AB's. Four of the gun barrels (three of the MP40 and one rifle) are severely bent and after a bit of a test i feel the material isn't going to straighten without snappping. 

Unfortunately the Pak 40 is missing the muzzle break. I'll chase that up and see if i can get the bit.

Wednesday, May 24, 2017

Valiant 1/72 WW2 25mm GI's

American infantry from the VM003 American GIs 1942/44 set by Valiant Miniatures. These came off the cover of Wargames Illustrated way back in 2009. I've waffled on about their size and it seems Armourfast are retooling them. There's a post on TMP with more details.

This is where i'm at with the figures, basic colours blocked in and a wash to blend it together. Highights to follow and I'll need unit flashes/insignia.

Monday, May 22, 2017

20mm WW2 figures including the Blitz Battle for the Hedgerows range

I've recently received a platoon of 20mm WWII figures from Simon over at Wargameroz's 20mm Ramblings. Most are from the Blitz "Battle for the Hedgerows" set in bags with their codes along with an SS mortar team (BBG9). I'm trying to work out the others (last three images) which are from a different company/ies? I haven't seen the Blitz figures in person until now and i'm impressed. They are quite quirky in their mix with a quality of sculpture that is up there with the AB or Warmodelling sculpts.


Officer and NCO Pack.2 Officers and 2 NCO's wearing assorted uniforms.
4 Figure Rifle Pack.All armed with K98s. Wearing smocks and mix of headgear.


4 Figure Rifle Pack. 
Armed with K98s , GEW41s and GEW43s and a mix of uniforms and headgear.

BBFH 8 MG42 firing off shoulder of No.2.
NCO armed with MP40. Mix of headgear and uniforms.


BBFH7 MG34 firing off shoulder of No.2 NCO armed with capture Thompson SMG. Mix of headgear all wearing smocks.
BBG9 Waffen SS figures in a mix of smock and M43 jacket.8cm GRW 34 Mortar & loader. Crewman crouching sighting. NCO with telephone.
BBFH9 Panzershrek Team moving. NCO with MP40. Mix of headgear all wearing smocks.
from left BBG5 MG34 crewman advancing,unreleased "Prussia 1945" mp40 late war smock and pants,? carrying two ammo cans,Kellys Heroes Radio Operator, ?

?

?, middle and far right are unreleased "Prussia 1945" figures in the late war reversible smock and pants


The basing begins. I've used 3/4 washers stuck down with Stik It Medium CA.


Sunday, May 7, 2017

A board instead of a TANKS Mat

I came across a pile of MDF offcuts at one of the local cabinet makers the other day and having just had a demo of TANKS i realised i could knock up a board.

No automatic alt text available.
3 x 3 MDF board with the first spray of green
Although its too small a a job for the house painting can its handy because i wanted to play with the airbrushes in preparation for doing some WWII armour. I've had a very cheap single action spraybrush for a long time but lost the little feed tube. Having bodged it up with some aquarium tubing it still works a treat and i did most of this board with the gun. When that was out of commission i bought a cheap bottom feed airbrush with a cup and a jar attachment. I'll probably pass this onto someone else as it just doesn't feed enough through for undercoating and feeding from the bottom when it has the cup attached is pretty distracting to do anything else, 

No automatic alt text available.
Dirt road and some assorted tank tracks.

Saturday, May 6, 2017

Miniature Scenery 28mm MDF Imperial Ruins

I've just pulled these out of a box while i was looking for something else and realised i'd never shared them here. They are the 28mm Imperial Ruins Corner and Straights from Miniature Scenery.


Done quite a while ago i've detailed the walkways with card tiles and some sand in the crevices, undercoated black then worked up the greys. I was looking for a very generic look and there are no modern touches apart from the loopholes in the corner section.

The ends are cleverly designed to push together (but not lock) to give a more solid wall effect or they could be scattered around as each piece can stand alone. The straights have two levels and the corner has four with the landing at the rear. There are two more kits which i don't have which are the gateway and a breached wall section.

28mm GW Ork and Imperial Guardsman for scale
These are the original router cut versions as they were a fairly old kit. It's possible Miniature Scenery have converted newer kits over to laser cut as they modernise the range. From memory the only fiddly bits were the buttresses and all went together well with PVA to stop it moving. Highly recommended they make a solid model for the tabletop.

Thursday, September 22, 2016

US Paras land

I was recently very generously given some 28mm Warlord Miniatures WWII figures by Swampy. The US Paras from the new "Band of Brothers" Starter Set along with an assembled set of the regular US infantry.

I've been beavering away getting them together. First impressions are they are beautifully made, great expressions on the faces, go together well but lack the extra bits of kit that would really give those extra options for kit bashing. There are a lot of Thompson SMG's in the kit.


I quite like firing figures and the kit is a bit short on Garands in that position so i cut out the carbine and added the M1 from the shouldered pose.

There is a base sprue in the kit but no larger bases so i've used an older flat GW 60mm base for the MG and crew and i'll probably build a second rather than trying to do more prone figures.
I've added a bazooka, bazooka rocket bag, grease gun, grenade hand and a Springfield scoped rifle from the remainders of the US kit (I'm not sure about the rifles issue but it will just count as a Garand if it's not needed).
The set of Warlord WWII American Infantry with lots of Springfield rifles.